Do It Yourself: Wall Accessories
If you’ve got a keen eye for Pinterest and Instagram feeds then you’ll have no doubt spotted these. Wall accessories have really regained popularity in recent years. Existing in a range of designs and sizes they can become a cool new feature in your house.
Wall hangings were everywhere in the 70s and are now returning but with modernised twists. They add a breath of fresh air when combined with modern design features at home through colour combinations and striking textures. If you’re looking to add a dash of colour and some texture to your home, wall accessories are a great way to go.
Bedside tables | 20 DIY Ideas >


“So, can we make these accessories ourselves?” we hear you ask. Yes, of course - let’s get to work! We’ve enlisted the help of designer Hazal Kızıltoprak to guide us through the process.
The materials you’ll need need:
Macrame thread and wool of your choice (we prefer to use three colours)
Embroidery hoop
Scissors
Wooden beads

We determine how much rope we will use based on the design we want for the wall hanging.

Cut all of the threads twice as long as the average lengths we want (we cut all of ours to roughly 1 meter.)

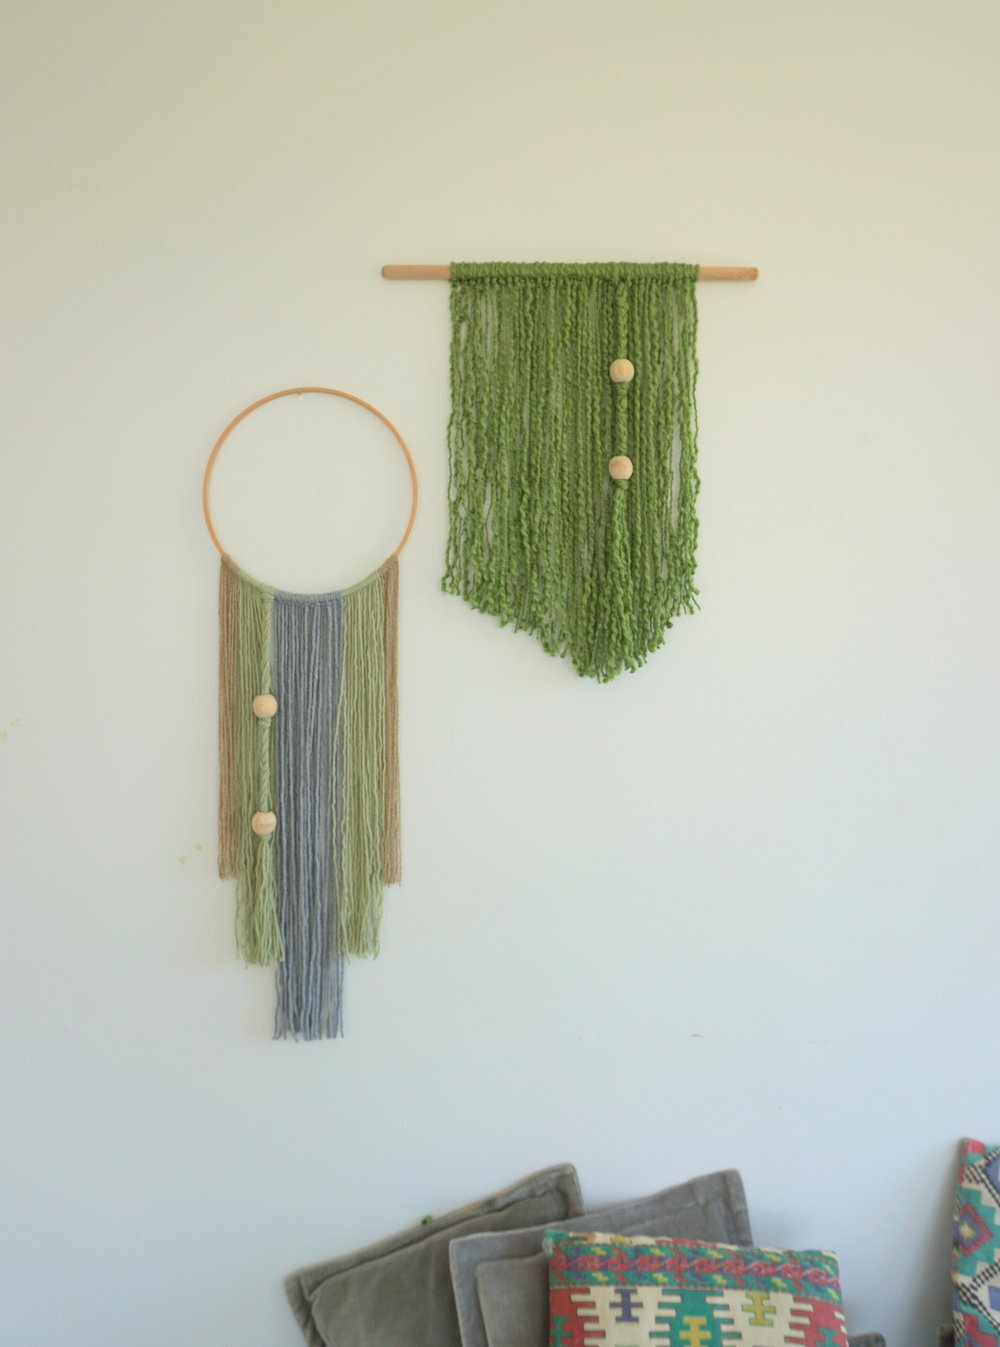
We begin by laying out and cutting the thread that we want to be in the middle of the design. Fold the thread in half. Take the folded end of the thread and place it on top of the embroidery hoop, and then pass each end through the fold. By doing this, you’ll connect a single thread to the hoop with two ends hanging.

Place threads of the same colour side by side. Try to connect the thread to the hoop tightly to create a neater look. Each time we tie a thread to the hoop, bring it closer to the next one until eventually a section of the hoop isn’t visible.
After the middle section has been completed, apply the same process to the other coloured threads on either side of your completed middle section.
** If you’re using threads of differing thickness, then use either more or less material to create equal sections.
After all the thread has been attached to the embroidery hoop, we have to cut the ends. In this design we wanted to keep the threads in the middle longer, and the other respective colours shorter.
** Trust your eye - you don’t need to cut with millimeter precision.
** You can cut the end of the thread straight or pointed depending on your preference.

After finishing the ends, the wooden beads can be used to add an eye-catching element to the overall design. Threads of the same colour can be bunched together and passed through the hole in the bead. We used 6 threads in our design.
Collect all of these threads as if they were a single string, and loop back around the embroidery hoop, as pictured. Then, we braid the threads after this point.

Take a wooden bead and thread your bunched threads through the hole, until the point you want. Make a knot after this. You can apply this process as many times as you want.
** When passing more than one thread through the wooden bead hole, taping together the ends of the threads will make your life a lot easier!

And then finally we attach the embroidery hoop to the wall and trim any uneven ends - and, voila! You’ve made your very own macrame wall hanging!
For anyone wanting to make a few more changes to their home, we highly recommend speaking to the service providers here at HomeRun.